7.30.2011

"Love is a fabric which never fades"...

Grandma Trudy
My grandmother was awesome. She was a very practical lady, and growing up through the Depression only strengthened this trait of hers. As a child, it seemed like Grandma had a solution for just about everything, and that included holes poked into our socks by our nonstop little feet. Whenever a sock got a bit worn, Grandma would darn them (and I'm pretty sure that had nothing to do with cursing at them) and give them back to us with new life in them.
A trait that I'm sure my mother inherited from my grandmother was her stash of fabric. Every size, color, pattern and texture imaginable is *sometimes* neatly stacked away in my mother's craft room. Bits from this project here, pieces from that project there...and she can look at each piece and tell you what was originally made from that remnant (I would love to have that kind of a memory!). See, that's what I love about fabric: even after a piece has sat dormant for 20 years, it still has life; it still has so much to give!!
I guess the tradition is continuing, because I had the privilege of sorting through mom's 'stash' and creating the beginnings of my own. It sits in a storage bin underneath one of my crafting tables, where a piece happened to catch my eye one night while I was in Scrappersville (a.k.a. my basement):
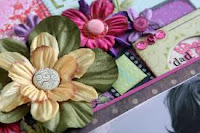
Journaling: you're such a little guy right now, but someday (all too soon) you'll be a daddy, too, with your son playing in his daddy's shoes

Let me start by saying that I love, love, love this page. It's probably my favorite page I've ever done, possibly more for sentimental reasons than anything.


A lesson that my grandmother taught me was about priorities. If all of your obligations were rocks of differing sizes, sized based on their importance to you, it's impossible fit all of the rocks into the 'container' you call a day if you don't start with the biggest (most important) ones first.

Let's apply this to a scrapbook page (not Grandma's intention, I'm sure...but none the less...). Start with a good base (biggest rocks). Add your picture(s) and title (medium rocks), and then embellish like crazy (a smattering of pebbles and sand!!).

I was lucky enough to have this great piece of red with white polka dot 12x12 paper tucked away in my stash. The edges were already distressed perfectly to my liking, and I love the juxtaposition between the print of the brown fabric and the polka dots of the paper.
On top of the patterned paper I added my brown fabric. It wasn't my original intention to have a torn look at the bottom, but when i pulled out the fabric from my 'generational' bin, that's how it was! --Either someone needed to enroll in The Basics of Fabric Cutting or needed a new, sharp pair of scissors!!--
I knew I wanted to sew around the edges of the fabric to permanently adhere it, so I chose to tack the fabric down with a few
Glue Dots in the center section only (adhesive + sewing needle = sticky, jammed mess!!) and then add the stitching.
On to my medium rocks...next came my pictures and title. I matted my main picture with two additional scraps of complimentary fabrics and spelled out my title using various fonts of {naked} chipboard.


Next, the pebbles!! I'm a sucker for ribbon and thread, so those are usually my go-to elements. Some ribbon went up by the main picture (the lightest ribbon has some knots tied along it to add some depth and interest) and I sewed a thick ric-rac along the bottom edge. I added a few threaded buttons (see my July 24th entry for my feelings on not threading buttons) and a Stampin' Up! mini library clip to finish off the pretties.
My journaling was added onto a semi-circle journaling card, and the words that I pulled from my text to use as my title I emphasized using some scrap cardstock (this is also a great method to use if you misspell or othwise make an error in your journaling!!).


So where will inspiration find you? In your grandmother's teachings? The community fabric stash? Or maybe the best page of your scrapping career will be created when your rocks all seem to fit snuggly into the 'jar' of your day.
7.27.2011

Cropping the night away...

So! You've signed up for your first crop, eh? Pretty exciting!
Let me first say, welcome. You're currently entering into a world of crazy ladies; a world where there is no eating or sleeping, because no page ever was finished while doing those miniscule tasks (ok, I exaggerate here. There has always been plenty of food at every crop I've been to!).
If you're like me, you should pity the person who is hosting your first crop. I sent roughly two emails per day (more on occasion) asking random questions and pulling out details like a dentist pulls teeth. What to bring, what would be supplied, oh, and what about extension cords and Cricuts? Would the room tend to be on the warm or cool side, and should I bring a trash can? Now, how cushy were the chairs, again?
*I would like to take a brief moment to publicly thank Holly VanDyne for her patience, guidance and unlimited text package*

Soon you will find yourself packing and wondering a) have I brought too much?, b) what have I forgotten?, and c) how will I ever fit all of this into my car???

(Important side note: all of your supplies should be archival safe (ie: acid and lignin free). It might not seem like a big deal now, but in 50 years when your children's children are looking at these, we still want the pictures to look like pictures!)

For those of you who are list makers (*I'm guilty*), here is a rundown of the basics (and I do mean basic basics) to make sure to include in your caravan of supplies:


  • Pictures.   You think I'm stating the obvious here, but trust me...this might be the most commonly forgotten item.


  • Paper.      Again, HELLO. But referring back to the 'pictures' comment... enough said.


  • Adhesive. This is where things start to get sticky (pun intended). There are possibly a million trillion options out there to use for 'glue'. My personal favorites? Glue Dots, Stampin' Up! Stampin' Dimensionals and stitching (please don't get me started with my love for my sewing machine while scrapbooking).


  • Markers/Pens.     There are a lot of fancy pens you can get from a variety of different stores and companies, but go simple at first. You can usually buy markers individually, so get just a few and see what you prefer. I really like the markers that have a fine tip end and a more broad, feather tipped opposite side. I use Stampin' Up! Stampin' Write Markers.


  • Embellishments.   Aaaahhh...the good part :) This is the part that takes you from fifth runner-up to a first place prize at the Young Author's Contest. Lots of people can adhere some pictures and pretty paper to a page and call themselves scrapbookers, but, to me, embellishments can make it true art (therefore making you an artist...slap that on a resume :D). You need only Google 'scrapbooking embellishments' to have a never-ending list of choices. Commonly used do-dads include buttons, ribbon, brads, eyelets, stickers, chipboard, rub-on's, glitter, die-cuts, flowers, phrases, etc.
    This part really is where the sky (or your bank account) is the limit!


  • And because you can never have too much...(just watching out for us addicts out there!!)


If you're a fly-by-the-seat-of-your-pants type person, you can stop reading here :)


I also tend to want to use my 'crop time' efficiently, so I plan, plan, plan!!
I like to go through my pictures and whittle them down to the handful that will actually make it to the page. From there, I pull out my Color Coach and decide on a color scheme. All of this info gets jotted down neatly (ppsshhht...right. I'm usually working a thousand miles a minute. Let's say legible, at best) onto a note card. Then I draw myself a little mini-page on my card and sketch out what I want to layout to look like. After that, I use the back of the card to jot down my journaling. The majority of scrappers I've met get a glazed-over-deer-in-the-headlights look at the mention of this subject. Fear not, and answer this question: why are you choosing these pictures to scrapbook? (Hint: your answer is your journaling.)


So there you are! You're ready for your first crop.
Now, take a deep breath and roll your shoulders a bit to loosen them up, because you're going to need all the strength you have to get the kitchen sink out of your pile of things to pack!!

    7.24.2011

    Mini Album. The first of many!!

    Let me start by saying WELCOME! Thanks for checking out my blog. It is guaranteed to be random, sporadic and oh-most-definitely crafty! 

    I am in no means a full time, professional or otherwise trained artist, but I love this stuff, and, in my option, that's half the battle.


    So without further adieu... 


    My first mini-album.

    I've had this wooden house-shaped album out of the package, painted and ready to use for at least three years (meaning I have no idea what company designed it). It was originally a neutral wooden color, and I added two coats of brown craft paint to both the front and back. I searched for a paper collection that had the look that I was going for and fell in love with the Lotus collection by K&Company, designed by Amy Butler.

    Using a collection is a great way to know that, although the pages don't necessarily match, they all 'go', and enough variation is added to make each page interesting and unique.
    I trimmed out my favorite designs of the collection to be just smaller than my album pages.

    One trick to this album is making sure the layering of elements will look good once the book is closed (mind the windows!!).

    At this point, you'll want to take a look at the pictures (or other main focal points) you will want to add to the album. You don't necessarily need to adhere them yet (think layering), but you'll definitely need to know where to leave space for them.

    The first element that I was thrilled to try out was grungeboard, by Tim Holtz. I'd heard about this product, but just thought it was a 'name brand' chipboard.

    WRONG!!
    My best description is that it almost has a leather quality, but you're still able to manipulate it like you would chipboard (ie: inking, distressing, etc.). Pieces are able to hang off of the edges of your work a bit without getting damaged because this material is so flexible and durable!
    I used an ink dobber to ink my 'Z', making sure to ink the edges. For me, forgetting the edges is like finishing a final exam with 100% correct and forgetting to put your name on it!!
    Finished product (after sanding the edges a bit and adding a few pearls from Stampin' Up!)


    The brown grungeboard letters ('rare', 'things') were stained using walnut ink (LOVE), and the smaller letters of 'Beautiful' were inked in a grey. Note how using a contrasting color to ink the edges makes them POP!


    You'll really want to be sure to use a great adhesive to tack down your elements to the pages, and I used Glue Dots (they work extremely well at holding down grungeboard!). There are no page protectors to save your book from little fingers here!! There is such dimension and texture to the lace pages, especially, that I wanted to be sure that nothings was going anywhere!

    Once you have your main elements added to your book (in my case, I was using three pictures and a Bible verse that ran throughout the pages) it's all about the embellishments!!


    I feel like mini albums give a little more freedom to be excessive! While my husband gets overwhelmed with the multiple elements, I love looking through the book and being able to notice a different feature each time. Here are a few of my favorite cram-them-every-free-space fancies:
    Again, it's in the details...thread those buttons, folks!!
    It's worth the extra time for a completely completed look.
    Ribbon Rosette
    You can easily make any ribbon into a rosette by simply putting down a circle of adhesive (or splurging on Glubers).
    I added another pearl to the center (but debated a button...it would have been threaded, of course)
    Let it all hang out!! Feel free to let your ribbon or other suitable embellishment hang off the edge of your album to act as a tab to turn the page.
    ...and perhaps my favorite little addition: the lace!!
    I bought this doily at a garage sale for $0.25 -- paying any more for it would have made it hard to cut into shreds!!
      I used it on two opposing pages to add some cohesiveness and used a lighter (and on one occasion, my husbands hand-held torch--EEK!) to singe the edges of the lace. I love the look this gave and it also served to prevent the cut edges from unraveling.


     There you go!! I hope you enjoyed the highlights of my first mini album.
    I can't wait to bring you more ideas, techniques and random selections of my scrapbooks :)